Tuesday, 31 August 2010

Fabric covered notebook tutorial

I was searching for tutorials when I first discovered craft blogs, so it seems fitting I should share one with you.

This is for the fabric covered notebook from my first applique post.  I used an A6 notebook and it used about 3 quarters of a fat quarter.  Of course, a larger or smaller notebook will use more or less fabric.

What you need:
Notebook
Fabric
Fabric scraps
Embroidery thread and needle
Spray glue suitable for fabric
Bondaweb

How to do it:

First, lay out your chosen fabric, on the reverse draw round the edge of the notebook, turning it so that you include the spine and back. Make a mark where the spine will be. Cut out leaving about 20mm around each edge.
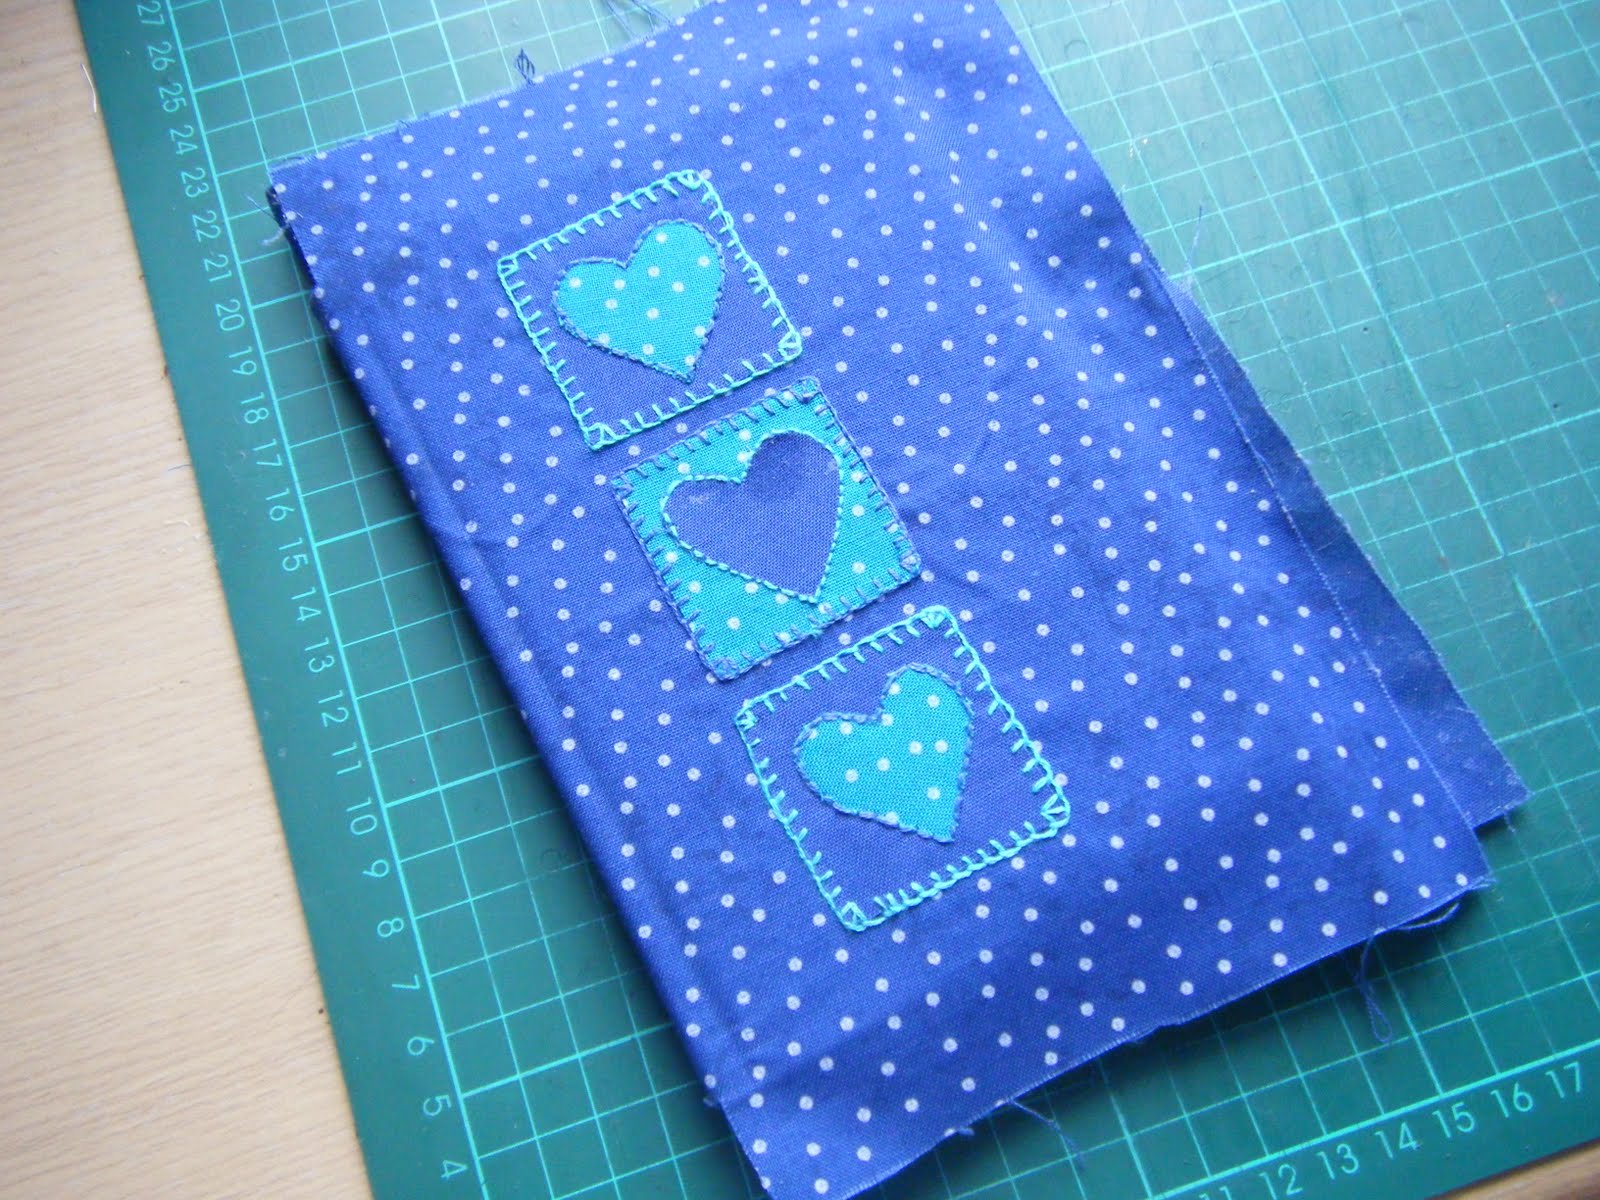
Cut out 2 small pieces of your applique fabrics and iron Bondaweb onto the back. Cut out 3 hearts and 3. squares from the fabric. Peel the back off the Bondaweb hearts and place on the contrasting squares. Iron to set.


On your main fabric, cut inwards where you have marked the spine to be and cut off all but a little tab. We're going to Bondaweb this tab back on itself to stop it fraying.


Pin the edges in place around the line you've drawn on the front only, this is so you can see where to place your design.


Position your squares with the hearts on the front of the main fabric and iron to set.


Now, sew a blanket stitch around the square in a contrasting embroidery floss. Do not not the ends, just hold them when you start stitching, and leave them free. They will be held in place by the glue in step 10.
Sew around all the squares in contrasting floss.


Sew a back stitch around the edge of the heart in a contrasting colour. I did the blue heart in aqua with it's aqua square stitched in blue, I did the aqua hearts stitched in blue with their blue backgrounds stitched in aqua.
Complete for all 3 hearts.


Put your main material face down, tuck all the embroider floss ends onto the squares. Spray glue all over the back of the material and press your cover down.


Put your main material face down, tuck all the embroider floss ends onto the squares. Spray glue all over the back of the material and press your cover down.
And you're done!  Now make hundreds in different colours!

Applique

Having fallen in love with the idea of sewing, I wanted to put some of the fabric I'd bought to good use.  I love notebooks and have loads of them lying around, so I decided to cover one with fabric and applique a design on to it.  I used my blue spotty material again, and added some hearts which I embroidered onto.  Here it is:
This is now my craft journal.

I used the same technique to make some birthday cards:
 - You'll have to go to the bottom of the blog to see this picture as no matter what I do, I can't get it to move here!

Then another notebook, for my mother-in-law this time:


And then branched out and tried another shape for cards:


I thought these little attempts were quite successful, so, being the impatient fool I am, I thought I could do anything and this led to my biggest challenge yet!  My goddaughter will be two next month and I wanted to make her an alphabet chart.  I had bought some 6" x 6" squares of fabric and thought they'd be a good base for the squares with the different appliques in.

And so, armed with fabric pieces, bondaweb and embroidery thread, I got going.

"A" was quite easy, I managed to draw a simple apple shape (I really can't draw as you will find out!) and applique it from red fabric and a bit of brown.  It's done in blanket stitch with the stem in satin stitch.

Then for "B" I decided to try a bird.  I got a bit adventurous here and tried out a feather stitch on the wings.

"C" took me a bit more time to draw as I couldn't get the shape right, but once I'd stitched it with running stitch and added button wheels I felt it looked like a fairly respectable car!

For "D" I used the template of a dog from "Applique for Little Ones" by Sylvie Blondeau.  His patch is in felt and his ears are double sided so they would hang.  They don't really but you can lift them up if you want!
I found a template on the internet for the elephant and outlined it with a lovely Pekinese stitch - this is the stitch that fired my interest in embroidery and got me scouting the internet for stitches and ideas.

I thought "F" would be easy, but I'm not that pleased with this little flower.

"G" was a nightmare.  It took me ages to find a word as I wanted it to have a "g" sound as in gate, not as in giraffe.  This girl template came from "100 Applique Motifs" by Deborah Green.  I adapted it a bit to look the way I wanted.

Then came "H".  What have I started??  I tried to make a house, but the more I work it, the less it looks like a house!  I started with 4 windows and cut them out of the house, attempting to fold a seam back to leave a neat edge.   It didn't work.  I think I need to try again with 2 windows.  I'll keep you updated!

Oh, and you may be wondering why there are no letters on this alphabet chart?  I'm going to sew them seperately and add some velcro to the back so she can match the letters to the pictures when she's a bit older.

Felties

The urge to sew led me into making felties.  I'd seen them on the internet and loved them so I bought a book - Felties by Nelly Pailloux.  What a great book it is!  I bought a stack of felt and got to work.

Meet pensive bunny (from Felties)


And Sleepy Fox (also from Felties)


And Timid Lion (also from Felties)


And Bashful Panda (yep, you guessed it - Felties!)


And Tree (my own design)


And Babushka, the keyring (Felties)


And the little bunnies (from Aranzi Aronzo's The Cute Book)


There are more to follow!

Sewing

I have always been adverse to sewing.  I could about manage to sew a button on, but that was where it ended.  I really was surprised when I was overcome with an urge to sew some little lavender sachets.  It all began before last Christmas and I'd been seeing lots of heart everywhere, including sewn ones.  I decided I HAD to make some for Christmas presents.

I bought a fat quarter bundle in Christmasy colours and set to work.  After a couple of setbacks, I got the shape right and started sewing.  I made 22 in all but didn't take a single photo and gave them all away! 

Since the wedding I was overcome with the urge to sew yet again so I bought another couple of fat quarter bundles - one in bright colour and one in the same colours with white polka dots.  I sewed one heart from each and tracked some lavender down to stuff them. 


Sorry about the rubbish photo!  I threaded them with embroidery thread and they are hanging in the hall cupboard to try to counteract the shoe smell in there!  They are all plain on the back.  It was at this point that I also realised the importance of matching thread in making them neat.  My first set of hearts were all sewn with white thread and it showed at the edges.

I had my first sewing machine lesson in June, with my mum.  She has now lent me her machine so I can practice and I'm in the middle of making a knitting needle roll from some gorgeous fabrics I bought.  More on that later.

Cross stitch

I suppose the cross-stitch came before the knitting as several years ago I cross-stitched a tiny little Mouse-Loft pig for my mum and made it into a notebook.  I had the urge again just before mum's birthday in November and cross-stitched her a Peter Rabbit bookmark.  The pain of completing it!  If only I'd known about embroidery hoops!  It took me hours and hours and hours but was presentable by the end!  I then made about 4 cross-stitch Christmas cards before embarking on The Big One. 

The Big One was a kit by Heritage Crafts of a couple dancing the Tango, originally painted by John Clayton.  Bought for me as a Christmas present, I eagerly began in the new year.  After a couple of weeks of frantic stitching, I had to stop as I had to prepare for the wedding, so I picked it back up again on the odd evening and then after the wedding.  Then, on Saturday 21st August, 2010, I finished it!!  Here it is in all its glory:

I love it!  I know some people frown at the idea of crafts from kits, but they can be such a good way of introducing a new craft, and so enjoyable.  It was counted cross stitch so I feel a lot of work went into it from my point of view.  I did initially make a mistake, I didn't notice that the front of the girl's dress was in the pink tones and carried on in the flesh tones, it wasn't until I'd got down to her skirt that my husband pointed out that she was topless! 

I have 2 more of the kits to complete now, both by John Clayton for Heritage Crafts, but I'm having a little breather before I begin!  The worst part for me is sewing the canvas onto the frame!

I've been hunting around the internet for cross stitch inspiration and have found plenty of fantastic websites, mainly French or Italian with free cross stitch grids.  I found them through Craft Gossip which does stitchery round ups very often.  I have a bit supply of these grids saved on my computer, awaiting my next plunge into cross stitch!

Knitting

I'll start with knitting as that is where I started!  My grandma taught me to knit as a small child and I loved to make toys from Jean Greenhowe's books.  When I decided, aged 32, to pick it up again, my grandmother was no longer with us so I turned to a book.  I chose Knitty Gritty by Aneeta Patel.  It really is a fantastic book and made it so easy to pick up. 

I started at the beginning and knitted a chunky scarf for myself...

The next project in the book was a pair of baby booties, so I knitted them.  Luckily my friends Lucy and Ben had just had a baby girl (hello Chloe!) so I could put them to use.

Then I knitted a hat.  My first disaster.  I wanted the hat to match the scarf.  The scarf had been knitted in a big chunky wool and the hat pattern called for DK.  I thought I could get round that by not using as many stitches as it said to use in the pattern, the result?  A new hat for my nearly-2 year old goddaughter, Rebecca!

So I knitted a hat in a different wool.

After all this knitting and purling, I needed a challenge so moved swiftly onto the lacy summer scarf.  I decided to knit this for my Aunty Gwen's birthday and used a Sublime merino wall in a nice shade of pink. 

I was so proud of it, I made another for my friend Graz's birthday!

Doing well in knitting so far!  This was all swiftly followed by a knitted mouse, for no reason at all, taken from Knitted Toy Tales by Laura Long:

And a lacy look mohair scarf knitted in Sublime Kid Mohair for my mother-in-law Nita's birthday.  It looks quite nice but was SO boring to knit, it's all just a loose knit.  Yawn.

At about this time I'd joined in a swap over on Cut Out + Keep and decided I wanted to knit a butterly brooch.  I found a pattern on the internet but when I knitted it, I didn't like it at all so, wait for it... I made up my own!  I was so so proud of myself for this simple little pattern:

(Little butterfly is bottom right - I don't know how to crop photos!!)

And there we are.  Next knitting post will be up to date and a bit more interesting, I hope!

The first post!

So here I am, posting.  I discovered blogs about 3 months ago, I know, I'm slow!  Then I thought about writing one... it finally got to the stage where I couldn't stop thinking about it and had to do it!

I wanted this blog to be about my new crafting experiences.  As a child and in my teens I tried loads of crafts - knitting toys, making things from Fimo, jewellry making, quilling and glass painting, but never, ever sewing.  I started making cards about 7 or 8 years ago and still do that now.  I've ventured out into a bit of scrapbooking and making notebooks with my fabulous Bind-it-All machine, but I always stayed within papercrafts. 

Suddenly, and for no real reason, back in November last year I decided to make all my Christmas presents.  This involved baking, painting wooden pen pots, cross stitching book marks, making notecards and booklets and decorating little boxes.  I got married in April so crafts went on the back burner, other than a cross stitch kit that my mum had bought me for Christmas and which I duly started. 

Wedding and honeymoon(s) over (thanks Mr Volcano for granting us an extra honeymoon!) the urge to make took over.  It started with some knitting.  I bought a copy of Knitty Gritty and I was off... 

I should really have started this blog back in May when it all began, but I didn't as I didn't know about blogs then (I warn you, I still don't now), so I'm going to have to try and travel back in time a little.  I'll start my blogs by craft category, but then they're going to get more general.

Thanks for reading!